Step 1: Make sure that there is no plastic insert attached to the battery that is preventing the battery from being used
To open the battery door, slide the edge of the door to the unlocked position as indicated on the bottom of the sensor pod.
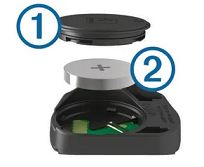
Step 2: Make sure that the battery cover of the cadence sensor is firmly closed, otherwise the sensor won’t be able to operate
Step 3: Make sure that the cadence sensor is properly installed on your bike
- Push the cadence sensor pod into the accompanying pod mound until the fit is tight and secure.
- Select the elastic loop length that best fits your crank arm. Note it should be the loop that fits tightest across the crank arm.
- On the non-drive/outside crank arm, place the cadence sensor against the inside of the left crank arm towards the beginning of the crank arm nearest the hub.
- Attach the elastic loop to the vertical slot with the arrow on the pod mount and pull the loop around the left crank arm and hook into the vertical slot on the opposite side.
- Rotate the crank arm a number of times to check for clearance between the bike frame, pedals and shoes.
Step 4: During the pairing process, pedal backwards and forward to “wake up” the sensor
Most cadence sensors have a battery saving feature where they automatically shut off when no activity is detected. Pedal vigorously backwards/forward to simulate a person shaking the sensor.
Step 5: Try to pair your bike one more time
Step 6: Troubleshoot your ANT+ USB Stick using Microsoft Windows 
Comments
0 comments
Article is closed for comments.