Spivi's Payment Processing Services allows you to take payments from your members when they book a class.
Prerequisites
- You must be subscribed to Spivi's Payment Processing Services.
- From the My Studio page, click on Services & Pricing.
- Click Subscribe
- Click Activate
Configuring your Settings

The following properties can be configured:
- Class schedule display type.
- The amount of hours before the event begins that members are able to sign up.
- The amount of MINUTES before the event begins that a member is no longer able to cancel the reservation.
- Enabling/Disabling new users signup option.
- Enabling/Disabling user Checkout in widget menus.
- Enabling/Disabling the use of Spivi Credits to participate in Spivi Replay classes from home.
- Display/hide the "Buy Now" link from the top menu.
- Display/hide the "Account Balance" link from the top menu.
- Allow people with zero balance to review the studio layout.
- If people have zero balance, redirect them automatically to the "Buy Now" page.
- Enable email notifications from Spivi® on class reservations.
- Edit the cancellation notice that is displayed when a member requests to cancel a class
- Option to select your preferred currency
Setting up your integration with Stripe

Sales Tax Rate: If you'd like Spivi to automatically include the Sales Tax, you should fill in the correct Sales Tax percentage according to your location.
Leave this blank if you do not wish to include the Sales tax.
If you haven't done so already, you should create a Stripe account HERE.
Stripe API Keys:
- Publishable Key: Input your Publishable key, which is unique to your Stripe account.
- Secret Key: Input your Secret key, which is unique to your Stripe account.
You can find your unique Publishable and Secret key from stripe.com, located in the Developers/API key section on the dashboard.
Setting up your Banking Information with Stripe
If you've just created your Stripe account, you will need to activate your Stripe account in order to link your banking information. Once you have linked your banking information, you must switch from Testing Data to Live Data, from the Dashboard.
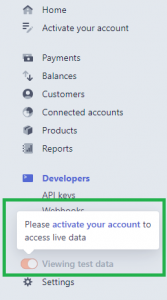
IMPORTANT NOTE:
Switching between Testing Data and Live Data on Stripe.com will change your Publishable/Secret key! Take a moment to verify that your Publishable/Secret integration keys match on Spivi and Stripe.
Setting up your integration with PayPal
You will first need to create an app in your PayPal account to generate a client ID for your account: 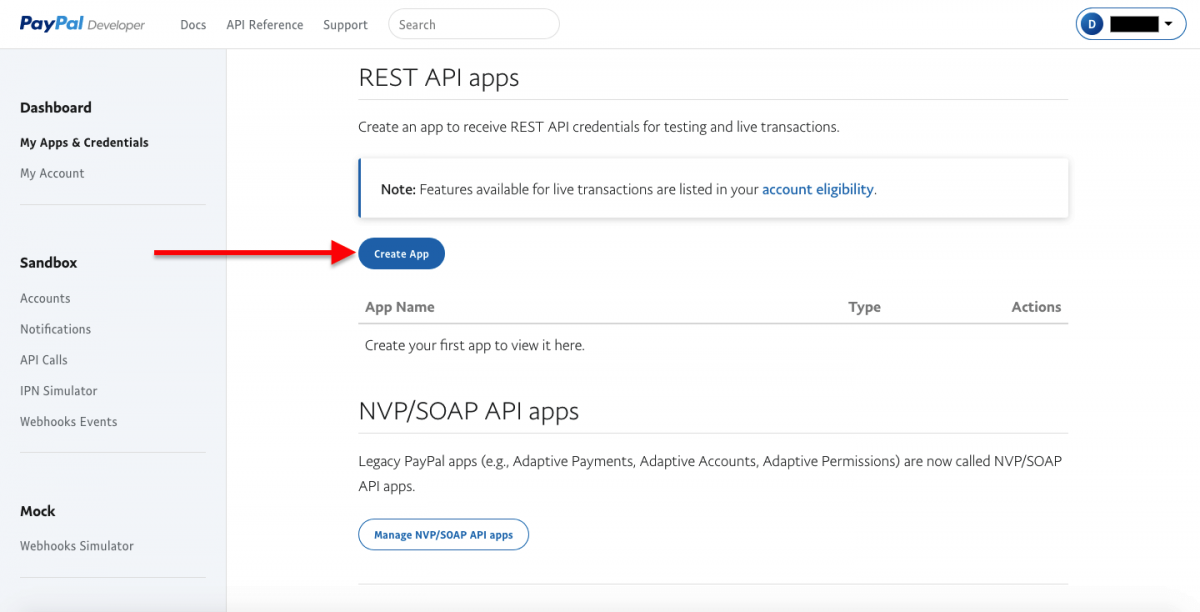
- Navigate to the developer PayPal website and create an account or sign in
- Once you are logged into your account on Paypal, navigate to https://developer.paypal.com/developer/applications/
- Select My Apps & Credentials on the left side of the page, then click “Create App” button to create an application.
- Fill in the necessary details and select Create App.
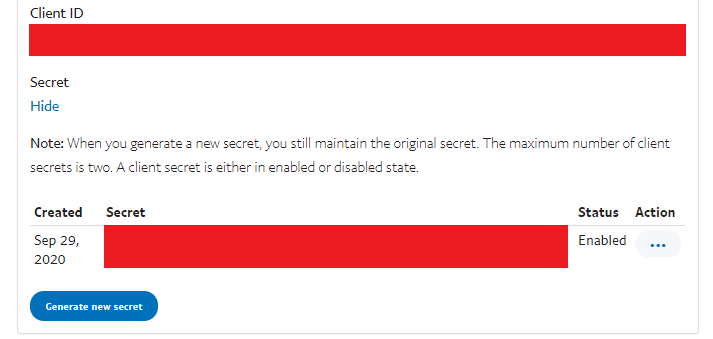
- Once the App is created it will have a toggle for sandbox and live and will also show the Client ID.
- Switch the toggle to Live.

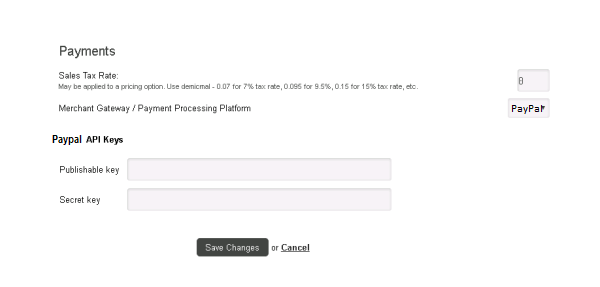
- Configure your "Merchant Gateway / Payment Processing Platform" option on Spivi - Merchant Settings and Advanced Options page to PayPal from the drop-down menu.
- Copy and paste the Client ID from PayPal, to the Publishable Key section on Spivi - Merchant Settings and Advanced Options page.
- Copy and paste the Secret from PayPal, to the Secret Key section on Spivi - Merchant Settings and Advanced Options page.
- Click Save Changes to complete the integration with Paypal.
Managing your Members' Credits
If you've just set up your Stripe or Paypal integration, you will notice a new field has appeared in each of your members' profiles in the Manage Club Members page. Club managers and administrators can easily view and add credits to a member's account directly from their profile.

 Clicking this button will allow you to choose a package that you wish to credit the user with. If you have not created your packages yet, please visit Services & Pricing to learn more.
Spivi does not store any credit card information. If you manually add any credit to a user's Spivi account, then you must manually charge the user's credit card from Stripe's website. If a member purchases Spivi Credit using the Spivi Mobile app, or the Spivi Web Widget, then they will automatically receive the credit that they purchased.
Configuring your Spivi Replay Settings to use a Member's Credits

- Review the Spivi Replay Tutorial video.
- Create a Replay Pricing Category from the "Services & Pricing" option found on the My Studio page.
- Navigate to the "Spivi Home Host Service" option found on the My Studio page. Then, select the "Replay Settings" option.
- In the Spivi Home - Replay Settings menu, select the "Anyone with matching credit on file" option.
- Enable the Replay Pricing Category that you created in Step 2.
- Navigate to the "Merchant Service Options" found on the My Studio page, then set the "Use member's credit when Spivi Home Replay Settings are set to only allow members with matching credit on file to replay classes?" option to YES. Click the Save button to save your settings.
Comments
0 comments
Article is closed for comments.